Fixed Once...
The first time the clutch broke I discovered that the push rod which connects the slave cylinder to the clutch arm had fallen off. I can only assume that it wasn't properly connected. I reattached it and couldn't get the clutch to disengage. I bled the clutch and still couldn't get it to disenage. This was starting to get annoying as I knew it worked before. After a 2nd bleed of the clutch including purging the slave cylinder, I tried a slightly longer push rod (well, a piece of m8 studding ;-) It still didn't work. To test it I had my son in the car pressing the pedal to the floor with the rear wheel jacked up. The wheel should have turned while in gear if the clutch was disengaging. I gave it one last try and pushed the wheel round hard and it suddenly moved. The clutch plate must have been stuck to the flywheel. Hooray, it was fixed. I should have heard the alarm bells at this point, if it was starting to sieze with the damp weather we were having it wasn't going to "go away". I simply patted myself on the back, ticked off the "get clutch working" job and moved onto fitting the doors.
It gets worse!
I needed to move the car out of the car port to fit the other door (car port isn't wide enough for both doors to be open). So, I fired up the beast and tried to engage reverse. Why wasn't it going into reverse? Oh No!!! The clutch had broken again. But, but, but, nothing had changed. It was working, how could it have stopped working. I checked the push rod, I bled the clutch (3 times!!), I jacked it up and could see the push rod moving the release arm. The stupid clutch plate was seized again.
The forum advice to free a seized plate was to get the engine to running temperature and blip the throttle. Made some good noise, but no joy. Failing that start it in gear and apply the brake. The car shot backwards out of the car port and applying the brakes just stalled the engine. Other advice included driving in gear and accelerating hard - not possible with a 1/2 finished non-road legal car. So it meant taking the gearbox out. No........!!!!!
After many weeks of pondering and looking at the problem of how to remove the gearbox while the engine is in the car and doing it all on my back I kept finding other simpler job to do. It was starting to frustrate me and I was spending every waking minute worrying about how it could be done. I finally got down to the business of removing the gearbox to get to the clutch.
First I jacked up the car as high as I could to give me lots of room underneath. I then made a simple little trolley to sit under the gearbox and allow me to slide it backwards away from the engine. Getting the gearbox and engine apart was no problem. I removed the clutch cover and found the clutch plate was nicely stuck to the cover. I had to use a mallet to get it off. I didn't mess around cleaning it, I just bought a new one. Not cheap, but worth it!!
The the fun and games started.
After aligning the clutch plate and attaching to the flywheel my back and forearms were starting to ache. I tried and tried, but I couldn't get the bell-housing to re-mate with the engine - wiggling, pulling, lifting, pushing and swearing had no effect. I even strained a muscle in my chest doing it. The clutch plate was obviously not aligned enough to allow the gearbox to connect. I bought a better clutch aligning tool that aligns the plate to the flywheel rather than the crappy plastic one that aligns plate to cover. And hey presto, with some wiggling and pushing I managed to get the bell-housing close enough to fit the bolts.
With it all bolted up I cheered loudly when the clutch disengaged!! Made my day!!

Welcome to my Cobra build diary. I have finished this Pilgrim Sumo Cobra kit car, and this diary will show you the fun and frustration of the build - Started April 2012. Completed car photo (April 2015). I hope you enjoy my build diary.
Showing posts with label Engine. Show all posts
Showing posts with label Engine. Show all posts
Thursday, 22 May 2014

Monday, 19 May 2014
Exhausts
Back last summer I managed to get some 2nd hand exhausts which were in good condition and perfect for my headers. The questions was what to do with the steel headers to stop them rusting. I looked into ceramic coating, but it's rather expensive, and doesn't help reduce the under-bonnet heat, so I opted for exhaust wrap. The problem with wrap is that it can absorb moisture when the car is left and that will rust the pipes. So, a coating of very high exhaust paint (actually I used fireplace paint!) solved the rusting problem and the exhaust wrap will reduce the heat. All good after a very wet winter with only a few engine starts... The wet winter has caused a clutch problem though - more on this later :-(


Once the headers were wrapped and fit, cutting holes in the body was simple and looked great once the plated were attached:
Once the exhaust L section was clamped on to the headers, adding the side pipes was easy with a couple of bolt holes into the chassis and some new rubber bobbins. I have also some exhaust filler to keep the noise down for IVA, but I'll stuff that into the exhaust just before the test so it has maximum effect.
I couldn't wait to fire up the v8 beast now that the exhaust was attached. Sadly it coughed and spluttered and there was finally a bang and burst of flame from the air filter. I quickly turned it off and waited for my pulse to return to normal. After some thinking and forum advice, I checked the timing, since there was fuel, and clearly spark. It was way out! I set it to 10deg BTDC and boom! It fired up and made a great noise. After a little while it even ticked over fairly well. I then got a boast of confidence and felt like I could rule the world. So I slid it into gear and reversed slowly a few feet.....YES! It moved. Sadly after a few feet the clutch pedal went to the floor and the car jerked backwards and thankfully stalled. The clutch stopped working. if you read on, this became the bane of my life for the next 8 months :-(
Friday, 22 February 2013
Accelerator cable
Having used the Sierra accelerator pedal, and some Edelbrock carbs, I was stuck for what type cable to use. The advice was a sierra cable - part number below for anyone who is also unsure:
 At the carb end I had to make up a simple bracket and add a spring.


Next post will be a lot more interesting....!
Monday, 10 December 2012
Cooling fan
Before plumbing the radiator I checked the 2 fans were working and were indeed sucking (or pull) fans, i.e. they pull air from back to front so when mounted on the back of the radiator they will pull the air through. Sadly they were blowing (or push) fans. Switching the polarity made them spin the other way, but due to the way the blades are made they don't work so efficiently in reverse. I returned them to Pilgrim who supplied a single big fan - which when you work out the surface area is bigger than 2 small ones (and cheaper too!).
I made some simple brackets and attached it to the radiator:

My thermostat housing has a bypass outlet to allow water to flow to heater. Trouble is I had no where to connect it as the back of my water pump had only 1 outlet, so I simply put a T piece.
Next is to fill with 50/50 antifreeze and water and check for leaks.

I made some simple brackets and attached it to the radiator:

Plumbing the engine wasn't simple, and the Pilgrim hoses supplied didn't fit the Rover V8, so I returned them and used some flexi hose. For anyone wanting the detail:
- Bottom of Rad connects to bottom of water pump
- Top of Rad connects to front of manifold (where thermostat is housed)
- Back of water pump to connects to heater (via a T piece - see below)
- Heater return connects to the back of manifold
- Expansion tank top and bottom to small pipes on rad top and bottom
My thermostat housing has a bypass outlet to allow water to flow to heater. Trouble is I had no where to connect it as the back of my water pump had only 1 outlet, so I simply put a T piece.
Next is to fill with 50/50 antifreeze and water and check for leaks.

Sunday, 28 October 2012
Preparing to "fire it up"
Lots of little jobs (sorry no photos).
- Wired fuel pump
- Connected fuel tank to fuel pump, disconnected it all and added in a fuel filter
- Connected fuel pipe in engine bay to carbs remembering the 2nd fuel filter - not really necessary, but can't hurt and since it is clear plastic you can see the fuel is being pumped to the carbs
- Blanked off the 2nd fuel pipe to the fuel tank (not needed as not using fuel injection)
- Connected the Sierra ignition switch to the loom and tested fuel pump (tick!):
Red - live
Yellow - key position I
Black/Yellow - key position II
Black/Blue - key position III (starting)
- Wired the coil to the DLM8 Distributor (actually to the amplifier/ignition module on the side). No where could I find a circuit diagram for this, but finally figured it out Red to Coil +ve, and Blue to coil -ve.
- Wired coil to ignition switch mkey position II
- Finally wired the oil pressure sensor.
4 things left to do:
- Fill with oil and turn over to ensure the oil pressure light goes out (pump may need priming)
- Bolt on exhausts
- Put some petrol in the tank
- Cross all fingers and pray before turning ignition switch
- Wired fuel pump
- Connected fuel tank to fuel pump, disconnected it all and added in a fuel filter
- Connected fuel pipe in engine bay to carbs remembering the 2nd fuel filter - not really necessary, but can't hurt and since it is clear plastic you can see the fuel is being pumped to the carbs
- Blanked off the 2nd fuel pipe to the fuel tank (not needed as not using fuel injection)
- Connected the Sierra ignition switch to the loom and tested fuel pump (tick!):
Red - live
Yellow - key position I
Black/Yellow - key position II
Black/Blue - key position III (starting)
- Wired the coil to the DLM8 Distributor (actually to the amplifier/ignition module on the side). No where could I find a circuit diagram for this, but finally figured it out Red to Coil +ve, and Blue to coil -ve.
- Wired coil to ignition switch mkey position II
- Finally wired the oil pressure sensor.
4 things left to do:
- Fill with oil and turn over to ensure the oil pressure light goes out (pump may need priming)
- Bolt on exhausts
- Put some petrol in the tank
- Cross all fingers and pray before turning ignition switch
Monday, 22 October 2012
Engine finally in
I finally ran out of those "small" jobs and it was time to fit the engine. After a few attempts, and much swearing I managed to get gearbox to mate with the engine. The clutch was aligned, but the spigot bush was obviously a perfect fit, so the gearbox needed to be perfectly level to slide in. Everything else was prepared and ready to go including, new bushes on the gearbox remote new gearbox mounting rubbers, and new clutch release bearing and arm (just hope it's all correct as I really don't want to EVER separate the gearbox and engine EVER again ;-)

We lowered the engine into the engine bay with no trouble at all (thanks Michael), until it became obvious that the engine mounts would not fit. After much measuring and more swearing I realised (OK Michael did), that I had the engine mounts the wrong way around - whoops!


The Loom
The hardest part about the loom is working out which wire is which. From experience I have learnt that labelling every wire saves so much time later on. So in front of the fire I laid out the loom front to back and labelled each wire. I also spotted a few mistakes in the wiring diagram and Pilgrim had supplied the wrong type of relay (Type A and Type B are not the same pin-out).
The next tricky bit is feeding all the wires through a hole in the bulkhead (not forgetting the rubber grommet - thanks ebay!). After that the fuse and relay holders need securing to the side (and top in my case) of the drivers side footwell:

The rest of the loom has been "laid" onto the chassis and temporarily cable tied in roughly the right place.
Sadly the Pilgrim loom is generic, so a number of the engine bay wires need to be shorten, e.g. the RoverV8 starter is drivers side. Not a difficult job, but a shame to un-bind the loom to remove wires.
The next tricky bit is feeding all the wires through a hole in the bulkhead (not forgetting the rubber grommet - thanks ebay!). After that the fuse and relay holders need securing to the side (and top in my case) of the drivers side footwell:

Sadly the Pilgrim loom is generic, so a number of the engine bay wires need to be shorten, e.g. the RoverV8 starter is drivers side. Not a difficult job, but a shame to un-bind the loom to remove wires.
Hydraulic Clutch
As previously posted the Sumo is design to work with a cable operated clutch as this connects to the Sierra pedal box. Problem is that the clutch is designed for hydraulic which makes a cables operated clutch stiff and unreliable. So the pedal box has been modified and fitted with a clutch cylinder. Here you see the pedal box and master cylinder under the dash
 And here's the fluid reservoir and the fluid line down the bulkhead to the slave cylinder
 All quite straightforward to fit - thanks Tony for supplying the mod and parts
I now need to bleed the whole system as nothing happens when I press the clutch pedal - really hope it's an airlock...;-)


I now need to bleed the whole system as nothing happens when I press the clutch pedal - really hope it's an airlock...;-)
Monday, 13 August 2012
Flywheel, Clutch and Gearbox
Life is always simple when the gearbox and engine come from the same car - in my case they didn't and that's where the fun started. I have a Rover V8 3.9l (and 3.5l) from Land Rover Discovery. There are 4WD cars, with gearboxes unsuitable for the Cobra. So I sourced an LT77 2WD box. Once I had figured out I needed a 2WD bellhousing, I thought I was ready to roll.
I bought a new clutch plate and cover to match the engine - WRONG! The 4WD Clutch cover is too large for the 2WD bellhousing, so off I went in search of a 2WD clutch plate/cover - which fits a Rover SD1. Guess what, it didn't fit onto the 4WD flywheel. At this point I wanted to cry and wonder how far back I was going to have to go to make it all fit. Someone from the cobra forum came to my rescue and sold me a spare SD1 flywheel, clutch plate/cover, and release bearing - Perfect! Rimmer Bros supplied the clutch release arm and it all looks good:

The new one is simply fitted by putting in the freezer over night to make it as small as possible, covering with grease and tapping into place.

I bought a new clutch plate and cover to match the engine - WRONG! The 4WD Clutch cover is too large for the 2WD bellhousing, so off I went in search of a 2WD clutch plate/cover - which fits a Rover SD1. Guess what, it didn't fit onto the 4WD flywheel. At this point I wanted to cry and wonder how far back I was going to have to go to make it all fit. Someone from the cobra forum came to my rescue and sold me a spare SD1 flywheel, clutch plate/cover, and release bearing - Perfect! Rimmer Bros supplied the clutch release arm and it all looks good:

A trial fit of it all showed that the spigot bush was too large for the 2WD bearbox shaft. The spigot bush shown below fits into the centre of the crank shaft exposed through the flywheel (shown above). The one fitted is intended for the 4WD shaft, and is a few mm bigger. Without the correct spigot bush the end of the gearbox shaft would not be correctly supported. Question is how does one remove the old one? Advise from the forums and a YouTube video shows a simple solution. It is counter intuitive to hammer something in to make it come out - I understood the idea behind it, but was sure that I would just end up covered in grease - But it worked ;-)
The new one is simply fitted by putting in the freezer over night to make it as small as possible, covering with grease and tapping into place.

Pilgrim recommend using a clutch cable, but having heard that this gives a stiff clutch pedal and even stories of snapped cables, I have decided to get a forum-buddy to make me a Hydraulic Clutch conversion - watch this space... In the meantime, it's loom time!
Off with the head
While stripping the engine I discovered that the previous owner had snapped an exhaust stud - v.frustrating. In the past I have never had much luck with removing snapped studs using various methods and tools, so I decided to let a professional do it. A machine shop were able to machine the stud out for a few quid. It did mean removing the head though


All now re-built with new gasket, and new head bolts. The Edelbrock inlet manifold, carbs, and rocker covers have been transferred from the 3.5l to the 3.9l.
Radiator Fitted
This is one of the simpler jobs. The hardest part is cutting parts off the brand new out of the box rad. As you can see from the image below, the bottom brackets need to be trimmed, and the plastic side supports cut off.

Once done, the rad is fitted to the front of the chassis with some home made brackets and M8 bobbins (bought from Ebay). The brackets still need to be trimmed once I fit the body depending how far back/forward the rad needs to sit.


Monday, 28 May 2012
Engine Shuffle
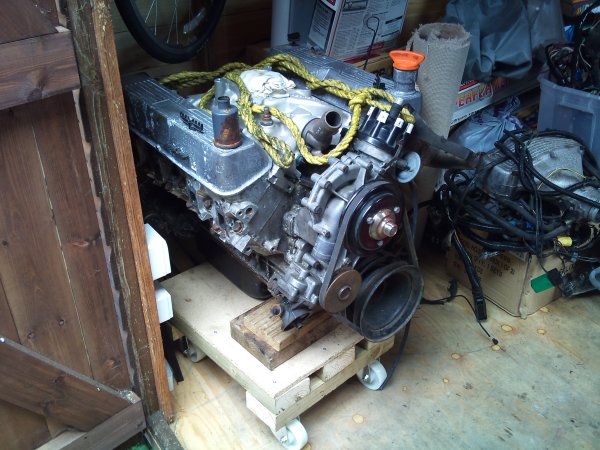
To cut a long story short the 3.5ltr Rover v8 engine I bought turned out to be a 1993 engine and not 1992. This means that it is subject to more stringent emissions tests which would probably mean a Cat. So I bought a 1990 3.9ltr Rover v8 (more BHP than the 3.5!)
I need to keep the 3.5ltr and in order to make space I put the 3.5ltr in the shed and the 3.9ltr next to the chassis ready to go into the car. Getting a engine into a shed proved a little challenging, but with the aid of a dolly trolley that I made I succeeded:

I need to keep the 3.5ltr and in order to make space I put the 3.5ltr in the shed and the 3.9ltr next to the chassis ready to go into the car. Getting a engine into a shed proved a little challenging, but with the aid of a dolly trolley that I made I succeeded:
Subscribe to:
Posts (Atom)